


Unlocking the Secrets of LED Matrix Control: From Single Pins to MAX7219 Drivers
Did you know controlling LEDs doesn’t have to be pin-hungry? Let’s break it down.
Using a microcontroller, controlling a single LED only requires one pin. Need to control 10 LEDs? That’s 10 pins. 100 LEDs? 100 pins… or is it?
Enter the LED matrix. By arranging LEDs in rows and columns—anodes of each row connected together, cathodes of each column connected together—you can control 100 LEDs using just 20 microcontroller pins.
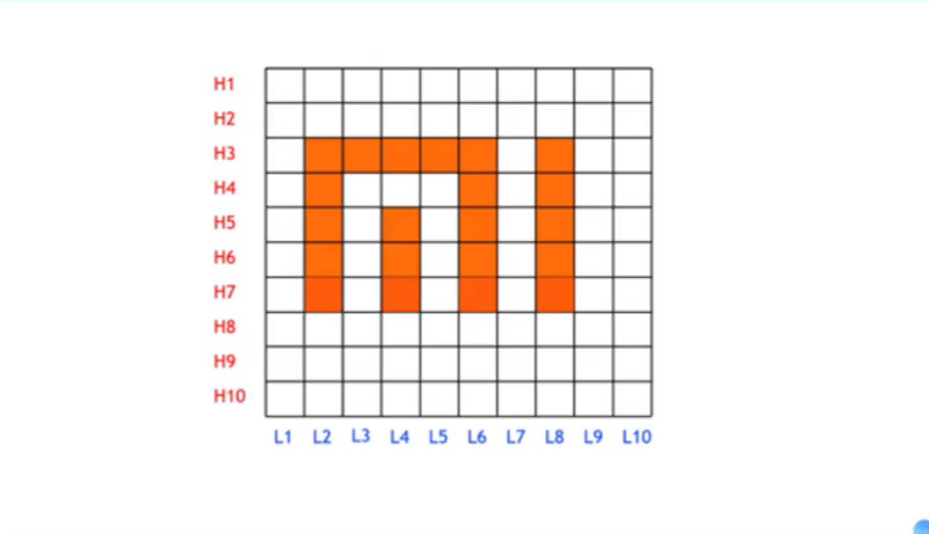
But here’s the twist: controlling a matrix isn’t the same as one pin per LED. For example, displaying a brand logo (like Xiaomi) requires selective row and column control:
- Pull a row high, and only specific cathodes are pulled low to light the right LEDs.
- Sequentially lighting each row, while rapidly refreshing the display, creates the illusion of a complete static image.
This is the core principle behind dynamic digital tubes, LED dot-matrix displays, and animated LED signage. The magic happens when the refresh rate exceeds the persistence of human vision, letting us see smooth, continuous images and animations.
For larger projects, you don’t need to rely solely on microcontroller pins. IO expansion chips like the 74HC595 can convert 3 pins into 8, 16, or more, while specialized driver chips like the MAX7219 are designed for common-cathode digital tubes, offering:
- Only 3 microcontroller pins needed
- Control of 16 IO ports (8 anodes + 8 cathodes)
- Seamless LED matrix animation
Whether you’re designing LED dot-matrix displays, digital signage, or dynamic animation boards, understanding matrix control and using the right driver chips can save pins, simplify wiring, and unlock stunning visual effects.
💡 What’s your preferred LED control method? Share your experiences in the comments!
Please enjoy the video to understand it completely:
https://youtube.com/shorts/DDNZXqjGP1Y